
Agentic AI Frameworks: Learn LangGraph
By building a single agent workflow with LangGraph Studio

This piece is part of a longer series on different concepts, technologies, and frameworks within agentic AI.
LangGraph is one of the more popular low-level orchestration frameworks for building agentic workflows among the developer community. It was built by the LangChain team, who hoped it would give builders better control by making the flow explicit.
It might feel overwhelming at first, but it gets easier once you understand the fundamentals—which is exactly what we’ll go through here by building a single-agent workflow that we can visualize and test in LangGraph Studio.
Essentially, with LangGraph, you’re writing code that can be visualized as a graph with nodes. You won’t be working in a visual programming system; instead, you code it manually and then visualize and debug it via LangGraph Studio (though that part is optional).

Understanding the fundamentals
To build something simple, we still have to go through a few core pieces: graphs, nodes, edges, and state.
The graph is the overall framework for setting up your agent’s workflow. See it as the environment we need to execute our workflow. We always set up the graph first.
After defining the graph, we set up our nodes—these are the core functionalities or operations. Nodes are where everything happens. In an agent workflow, a node could do anything from calling an LLM to invoking a tool (like a search function or an API), or performing some computation.
The edges are the connections between nodes. They tell the graph which node to go to next. Edges can be static (always go from A to B) or conditional (branch based on something in the state). So essentially, nodes do the work, edges decide what happens next.

State is the current memory or context of the workflow, where we hold all the data that flows between nodes.
You can think of state as short-term memory—it sticks around during the current run or conversation. It often holds things like conversation history between LLM calls or variables we need in multiple places.
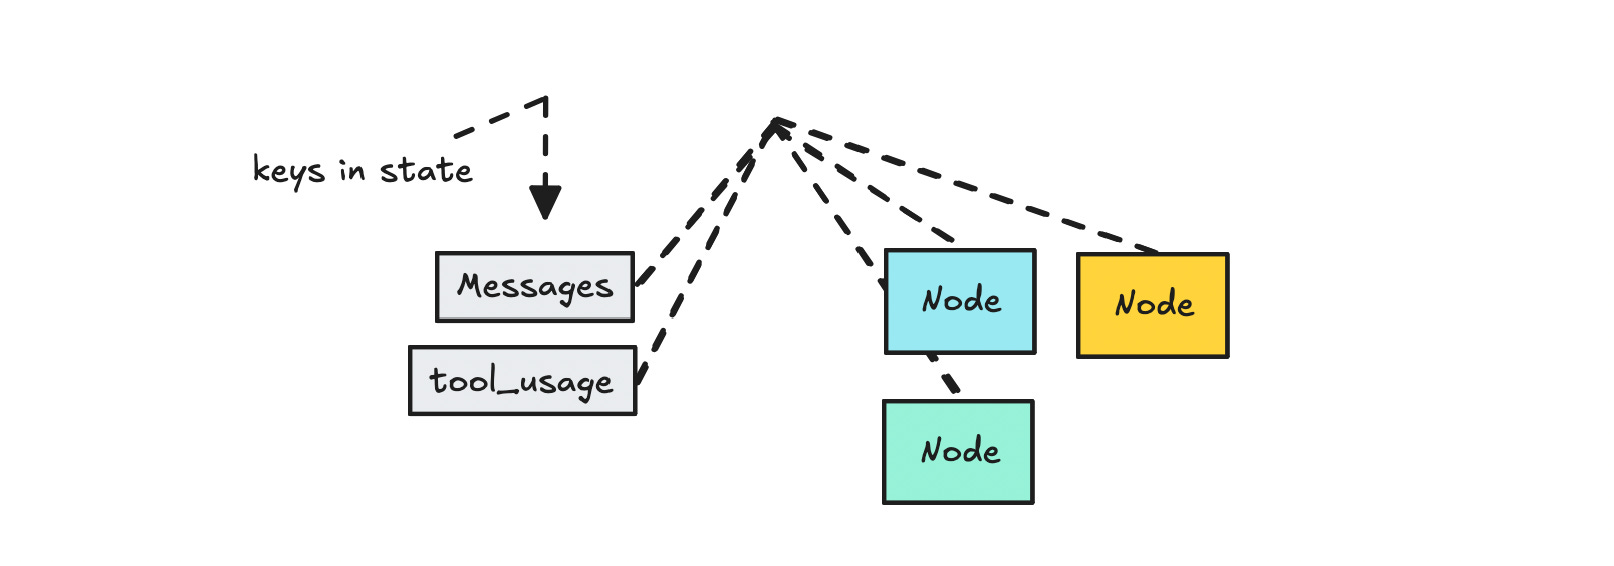
Technically, it’s just an object where we store relevant info and pass it along from node to node. This is especially important for LLMs, since we need to pass in the conversation history for each call (as LLMs are stateless by nature).
So in short: the graph is the canvas, nodes are the actions, edges define the flow, and state carries the data or information throughout.
Setting up the environment
To make this work, you’ll need to have Python installed on your computer—version 3.9 or above.
You’ll also need the latest version of Docker. If you run into issues with an older version not updating, uninstall Docker completely and download the latest version from scratch.
Then, download LangGraph Studio (desktop), since we’ll use it to visualize and debug the workflow. If you’re not on a Mac, there should be other options you can explore.
Setting up the files
To start, you can create a new folder to set up this workflow in:
mkdir langgraph_example
cd langgraph_example
Inside this folder, create another folder called agent:
mkdir agentThis is where we’ll set up the code for the agent.
Since I’m using LangGraph Studio, I’m organizing the code for that—but you don’t have to follow this exact structure if you’re not using the Studio.
Now create a langgraph.json file:
touch langgraph.jsonThis file tells LangGraph where to find the agent code and the .env file for credentials:
{
  "dependencies": ["./agent"],
  "graphs": {
    "agent": "./agent/agent.py:graph"
  },
  "env": ".env"
}
Next, go into the agent folder and create a requirements.txt file:
langgraph
python-dotenv
Also create a file called agent.py in the same folder—this is where we define our workflow.
So far, the structure should look like this:
langgraph_example/
│
├── langgraph.json
│
└── agent/
    ├── agent.py
    └── requirements.txt
Defining the graph
Now we can start building our agent by defining the graph. As mentioned earlier, the graph is the foundational structure for the workflow. It acts as the execution environment where nodes, edges, and state work together in a coordinated way.
In agent.py, start with this:
from langgraph.graph import StateGraph

# define a new graph
workflow = StateGraph('')
This will allow us to later attach nodes as operations/functions, and edges to define transitions between them.
Define the state
Next, we define the custom state and pass it to StateGraph:
from langgraph.graph import StateGraph
from langgraph.graph import add_messages
from langchain_core.messages import BaseMessage
from typing import TypedDict, Annotated, Sequence

class AgentState(TypedDict):
    messages: Annotated[Sequence[BaseMessage], add_messages]

workflow = StateGraph(AgentState) # Add the AgentState here
Think of state as a schema that defines what fields can exist and flow between nodes. When a node returns data, it’ll be checked against this schema. If the key exists, it gets updated—if not, you’ll likely get an error.
Here we’re only using messages, but you can expand this to include any data you want passed between nodes.
If you're unfamiliar with how message history works in LLMs—remember they’re stateless. We need to store messages ourselves so the model “remembers” context between calls.
Is it necessary to have this state object in LangGraph? Yes. Without it, the model wouldn’t know what tools were called or what information it had gathered. And building this without tools defeats the purpose entirely.
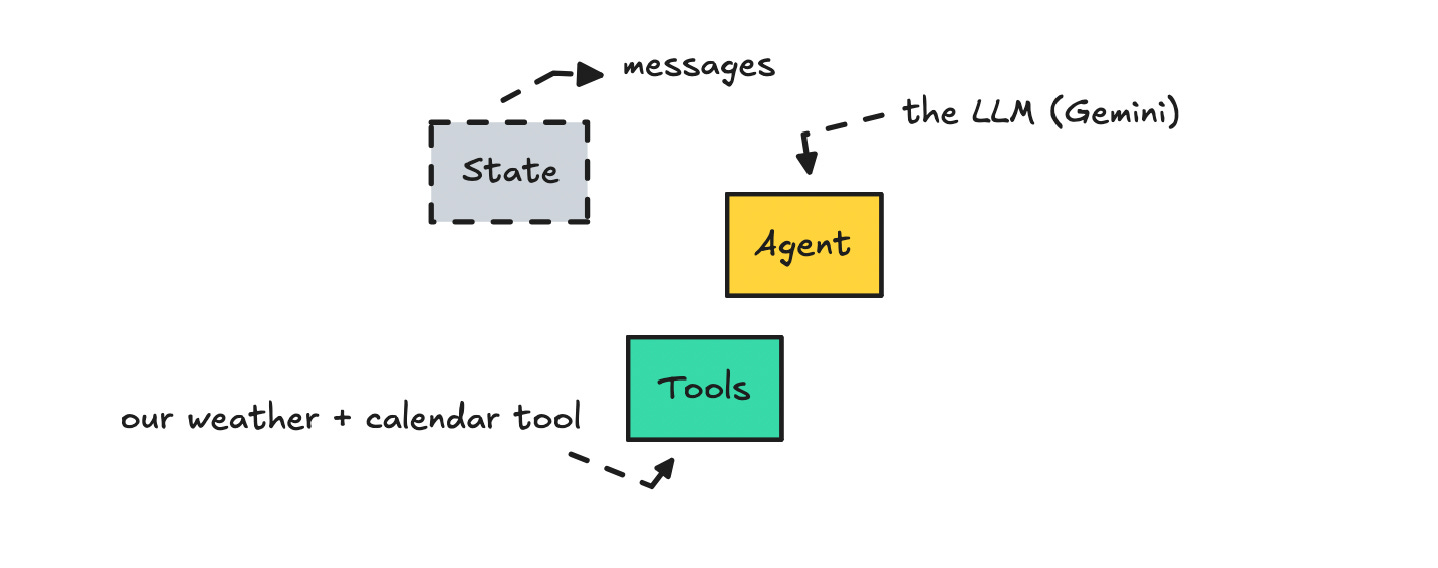
Set Up the LLM
Next up we’ll set up the LLM model we’ll be using as the base for our agent. We’ll use LangChain to connect to Gemini 2.0 Flash:
from langchain_google_genai import ChatGoogleGenerativeAI

def _get_model():
    model = ChatGoogleGenerativeAI(model="gemini-2.0-flash-001")

    return model
To be able to import ChatGoogleGenerativeAI we need to add this dependency to requirements.txt:
langchain_google_genaiAlso make sure to create a .env file in the root with:
GOOGLE_API_KEY=your_key_hereLangChain will automatically pick this up based on the path set in langgraph.json.
If you want to use another model you can look into LangChain documentation on models here.
Call the Model
Now let’s define the function that we’ll attach to a node that calls the LLM:
system_prompt = "You are such a nice helpful bot"

def call_model(state):
    messages = state["messages"]

    # add the system message
    system_message = SystemMessage(content=system_prompt)
    full_messages = [system_message] + messages

    model = _get_model()
    response = model.invoke(full_messages)

    return {"messages": [response]}
As you see here we can directly access state via the params where we store the messages of the function and then simply invoke the model. The messages are then returned to state.
Here you will ideally add some error handling in case the LLM call fails, but to keep things very simple I’ve just added the bare minimum.
Define and Attach Nodes
Now that we have the LLM setup we can start to define our nodes.
Remember the nodes are the functions or operations in our workflow. The first node for the agent we’ll point to the call_model function we defined earlier.
# define nodes
workflow.add_node("agent", call_model)
workflow.add_node("tools", tool_node)
We can then setup one for the tools it should have access to. As of right now we still haven’t defined what is in the ‘tools’ node so we need to code this as well.
Adding tools
To add tools, we’ll create a few mock tools (functions) just for demonstration. These should ideally do something meaningful—like calling an API and returning real information:
from langgraph.prebuilt import ToolNode
from langchain_core.tools import tool

@tool
def weather_tool() -> str:
    """Get the current weather."""
    return "Weather is 19°C and Partly Cloudy"

@tool
def calendar_tool() -> str:
    """Check your calendar for meetings on a specific date."""
    return "No meetings scheduled"

all_tools = [weather_tool, calendar_tool]
tool_node = ToolNode(all_tools)
We then bundle the tools together into a ToolNode that we import from LangGraph. This one should handls the execution of tools in our workflow.
If you define parameters for the tools, the model will understand that it can use them after we bind them. It will receive the tool name, description, parameters, and return type.
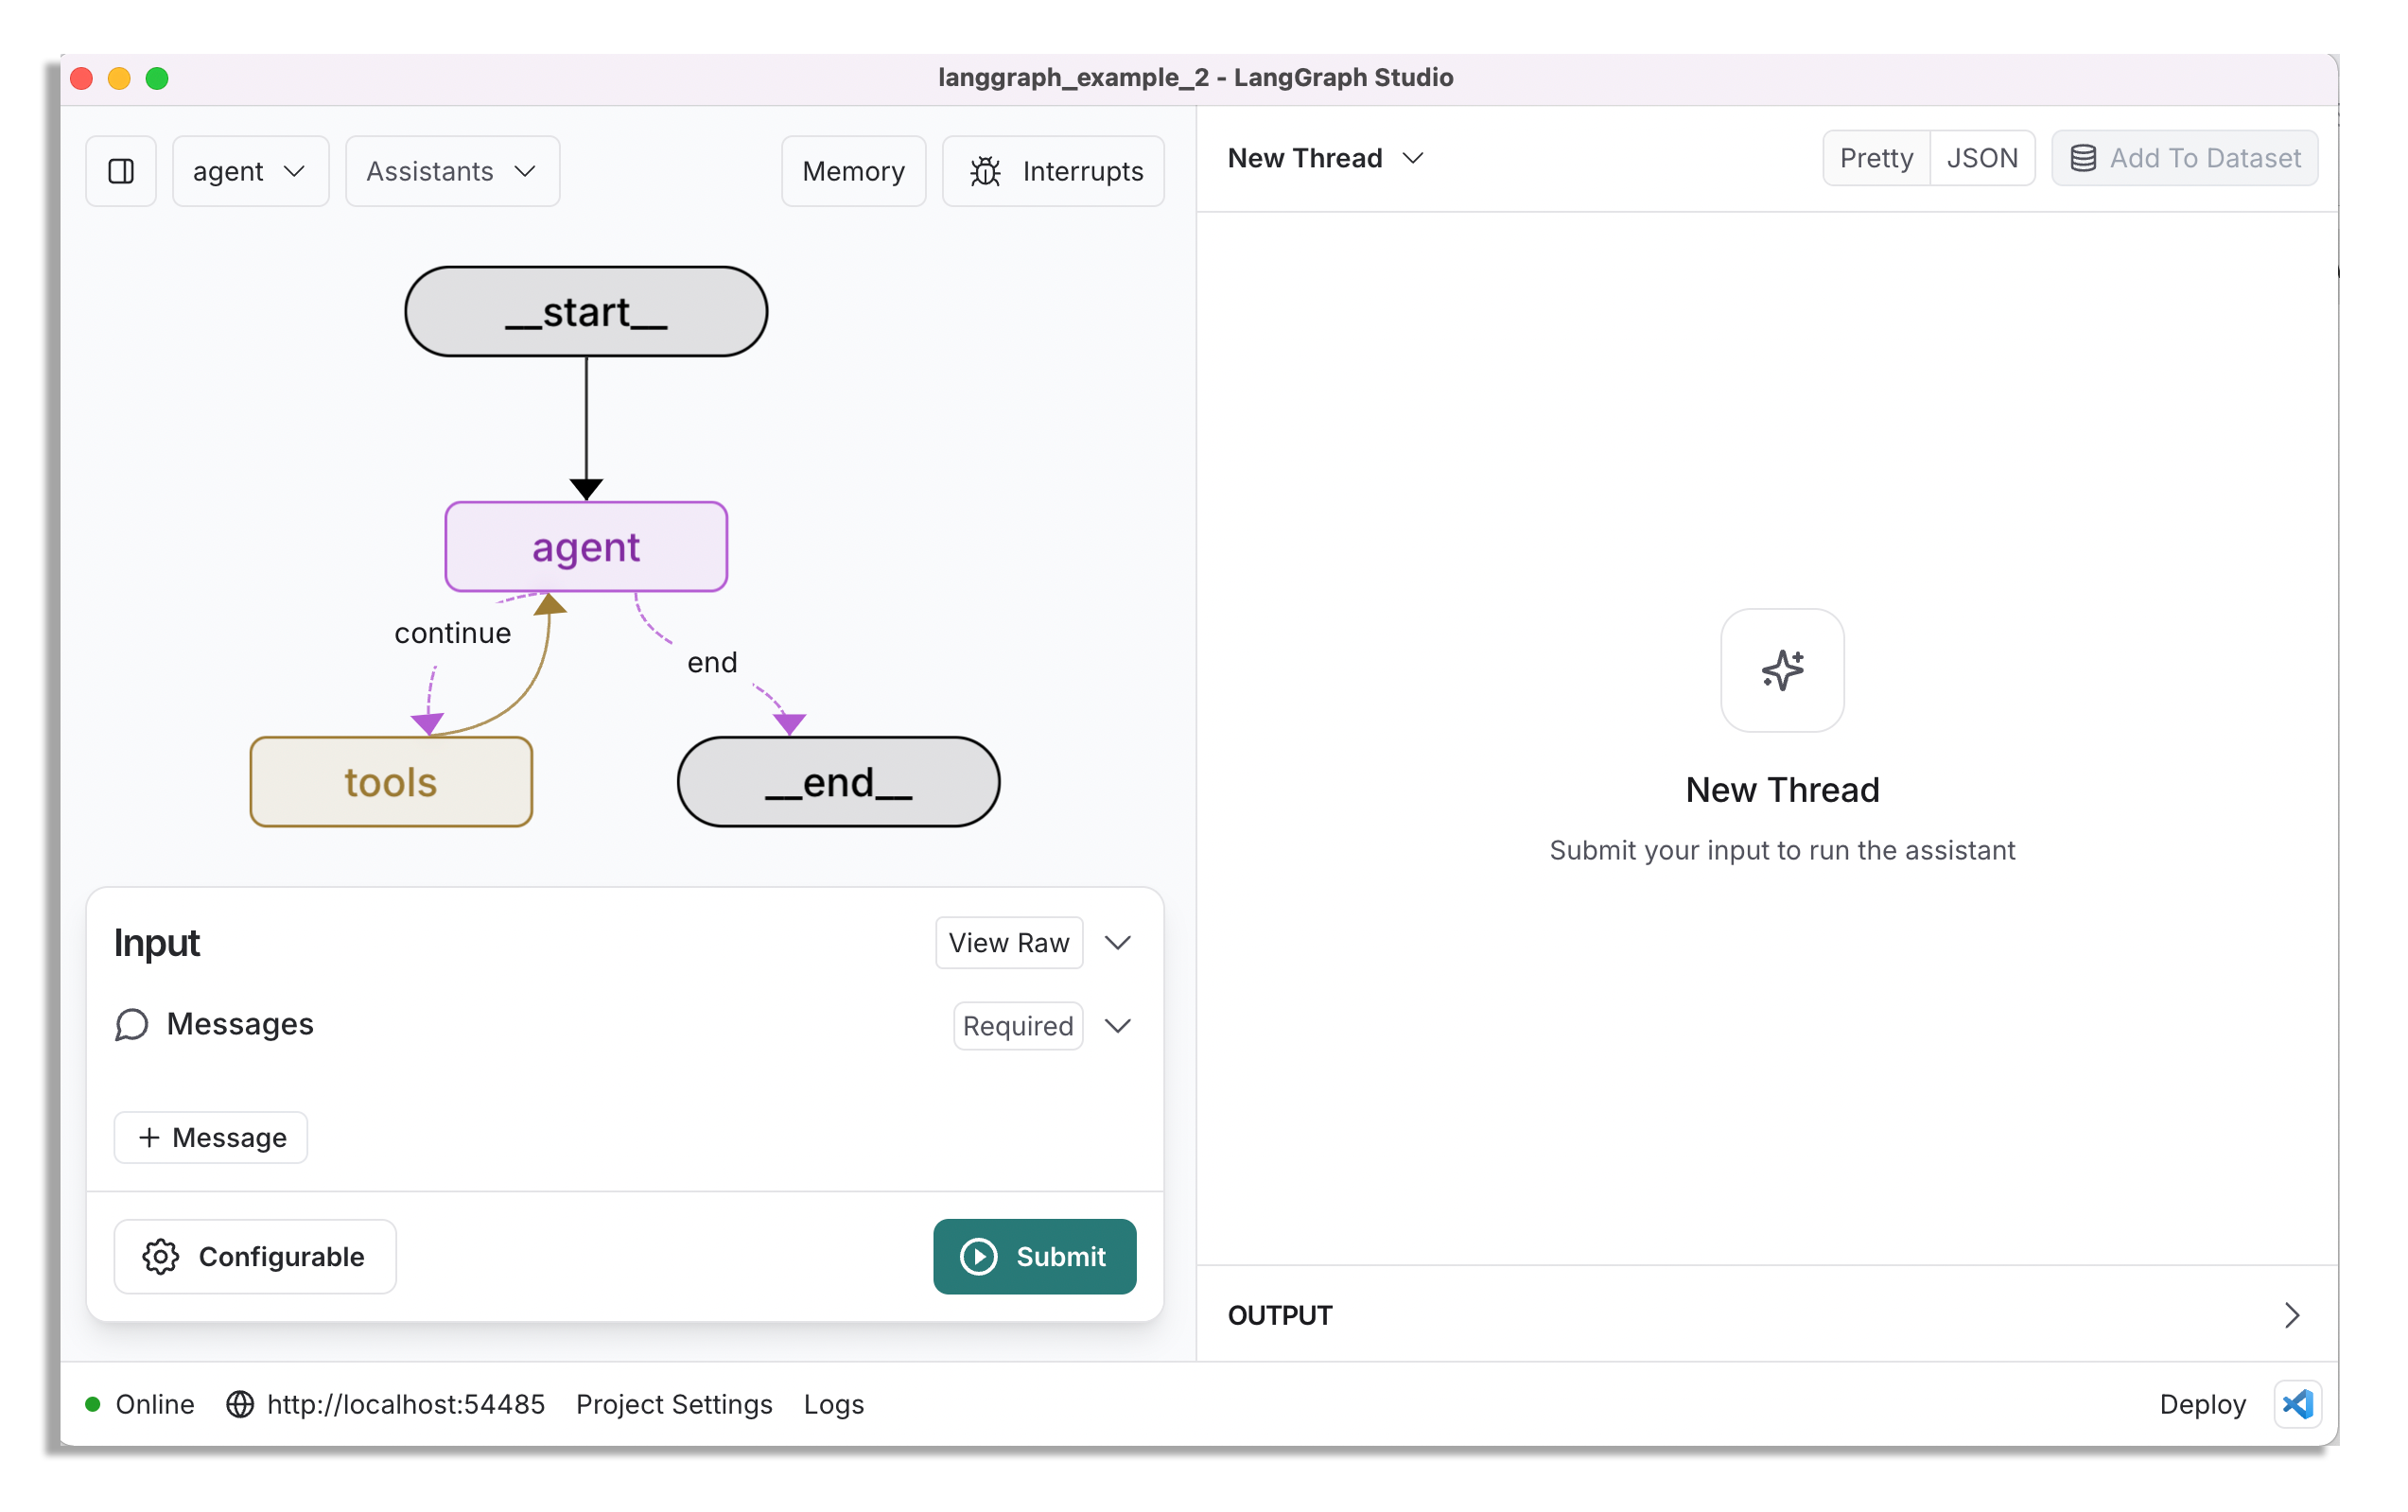
We can now visualise what we’ve set up so far.
As noted earlier, when we bind the tools to the model, it will become aware of their existence. So we need to go back to the _get_model() function and update it:
from langchain_google_genai import ChatGoogleGenerativeAI

def _get_model():
    model = ChatGoogleGenerativeAI(model="gemini-2.0-flash-001")

    model = model.bind_tools(all_tools) # add this line

    return model
This part is crucial—it tells the model which tools are available and how to use them. There’s a lot of abstraction happening here where LangChain structures the interaction between your Python code and the LLM API using bind_tools.
I would say there are abstractions in this entire framework that you may want to do more proper research around later.
Adding edges
Now we can start connecting these nodes, but first we set the entry point for the workflow:
# entry point
workflow.set_entry_point("agent")
Next, we’ll define some conditional logic, where we set up a function that decide if we should keep calling the LLM based on what it did last.
# define the function that determines whether to continue or not
def should_continue(state):
    messages = state["messages"]
    last_message = messages[-1]
    # if there are no tool calls, then we finish
    if not last_message.tool_calls:
        return "end"
    # if there is, we continue
    else:
        return "continue"
This logic tells the workflow to continue if the model just used a tool, and end if it didn’t.
To support this, we set up a conditional edge (a dashed connection between the agent and tool nodes):
from langgraph.graph import END

workflow.add_conditional_edges(
    "agent",
    should_continue,
    {
        "continue": "tools",
        "end": END,
    },
)
If the last LLM call didn’t use any tools, we assume the workflow is complete and stop it.
Here we are also importing END from LangGraph which is a termination signal to stop node traversal and return the final result.
We also need to connect the tools back to the agent:
# connect tools back to agent
workflow.add_edge("tools", "agent")
This is needed so that after a tool executes, its result is sent back to the LLM.
A question that might come up here is: why do we need this graph structure if the model already knows about the tools through bind_tools?
The answer is: there's a difference between the model knowing about the tools and actually executing them. The model can't execute tools on its own—we need the graph to define and control that execution.

Compiling the workflow
The last thing we need to do is compile the workflow:
graph = workflow.compile()Without this step, nothing will run.
The finished code will be very simple for our agent.py file.
| from langchain_google_genai import ChatGoogleGenerativeAI | |
| from langgraph.graph import StateGraph | |
| from langgraph.graph import add_messages | |
| from langchain_core.messages import BaseMessage | |
| from langchain_core.messages import SystemMessage | |
| from typing import TypedDict, Annotated, Sequence | |
| from langgraph.prebuilt import ToolNode | |
| from langchain_core.tools import tool | |
| from langgraph.graph import END | |
| # define the state schema | |
| class AgentState(TypedDict): | |
| messages: Annotated[Sequence[BaseMessage], add_messages] | |
| # define the tools available | |
| @tool | |
| def weather_tool() -> str: | |
| """Get the current weather.""" | |
| return "Weather is 19°C and Partly Cloudy" | |
| @tool | |
| def calendar_tool() -> str: | |
| """Check your calendar for meetings on a specific date.""" | |
| return "No meetings scheduled" | |
| all_tools = [weather_tool, calendar_tool] | |
| tool_node = ToolNode(all_tools) | |
| # define the graph | |
| workflow = StateGraph(AgentState) | |
| # get the model | |
| def _get_model(): | |
| model = ChatGoogleGenerativeAI(model="gemini-2.0-flash-001") | |
| model = model.bind_tools(all_tools) # bind the tools | |
| return model | |
| # invoke the model | |
| system_prompt = "You are such a nice helpful bot" | |
| def call_model(state): | |
| messages = state["messages"] | |
| # add the system message | |
| system_message = SystemMessage(content=system_prompt) | |
| full_messages = [system_message] + messages | |
| model = _get_model() | |
| response = model.invoke(full_messages) | |
| return {"messages": [response]} | |
| # define nodes | |
| workflow.add_node("agent", call_model) | |
| workflow.add_node("tools", tool_node) | |
| # entry point | |
| workflow.set_entry_point("agent") | |
| # define the functionality that determines whether to continue or not | |
| def should_continue(state): | |
| messages = state["messages"] | |
| last_message = messages[-1] | |
| # if there are no tool calls, then we finish | |
| if not last_message.tool_calls: | |
| return "end" | |
| # if there is, we continue | |
| else: | |
| return "continue" | |
| workflow.add_conditional_edges( | |
| "agent", | |
| should_continue, | |
| { | |
| "continue": "tools", | |
| "end": END, | |
| }, | |
| ) | |
| # connect tools back to agent | |
| workflow.add_edge("tools", "agent") | |
| # compile | |
| graph = workflow.compile() |
Now, this is a very simple workflow we’ve gone through—just for demonstration. To build a multi-agent workflow, you’ll need to add to the state and then add more nodes and conditional logic to the graph.
Testing the workflow
To test this workflow, open up LangGraph Studio, connect to LangSmith (free to create an account), turn on Docker Desktop (make sure it's the latest version), and then open the langgraph_example project.
Once it’s loaded, you’ll be able to add a human message and submit it to see what happens.
Remember, it only has those two mock tools available, so it won’t be terribly useful.

You can see in my example that I first asked it to check the weather and my calendar, and then got the final response at the end.
I would keep playing around with it until these concepts stick or do some research around how everything works to get more comfortable with it. As a suggestion, you can start setting up real tools that check the news (or actual weather) in the workflow above.
Hopefully, you learned something—if LangGraph is new to you. Feel free to check out more of my work on TDS and Medium as well.
😘