
Learn Advanced Image Generation: Style Transfer
Testing IP Adapters for SD 1.5, SDXL, and Flux in ComfyUI

In this piece, I'll dig into IP Adapters, a tool that lets us prompt image models using images instead of text. Rather than describing what we want in an image, we can use another image, possibly alongside a text prompt, during the generation process.
This makes it possible to create variations or transfer styling from one image to another.

I'll cover how IP Adapters work, the kinds of results we can get when transferring styles, and how different models and settings affect the outcome.
This should be a useful read for designers and anyone new to advanced AI image generation. To test this out using SDXL you can navigate here.
I always aim to make things accessible for beginners, so you can follow along regardless of your skill level. But I recommend you go through a quick intro to ComfyUI first in this article.
The Theoretical Part
How an IP Adapter works
To understand how an IP Adapter differs from other technology, we first need to clarify what it isn’t.
An IP Adapter is not the same as image-to-image. With image-to-image, you start with a latent representation derived from your initial image. This means that if you set denoising very low, you should get your original image back.
You’ll see me demonstrate this below, with denoising set at 0.15 we get the exact image back.

If you want to test image-to-image with Flux Dev, you can set the image as the latent in your K-sampler. See examples here.
With an IP Adapter, you can think of it as using your image as a reference in the diffusion process rather than as the starting point.
Because we’re using an image as a reference, we can control how much it influences the final output. This allows you to balance how closely the generation follows the reference’s style versus how much the text prompt takes over.
Base models will produce different results even when using the same reference image. That’s why you’ll need to experiment with different IP Adapters and base models to find the right combination for your use case.
Some IP Adapters, such as FaceID, can preserve facial features, but as mentioned earlier, I’ll primarily focus on style transfer here.
Why use an IP Adapter?
If you come across a really cool image and want the AI image generation process to draw inspiration from it, this is where an IP Adapter can be useful.
You can infuse a specific brand style into visual assets to maintain consistency, experiment with different visual styles in seconds, or blend multiple images—opening up a lot of creative possibilities.
Of course, there are other ways to go about it.
You could use a vision model like Florence2 to describe the image, turning it into text with image-to-text and then back into an image with text-to-image. You can also use different LoRAs to influence the process, which is why IP Adapters are sometimes called "one-image LoRAs."
Many people working in ComfyUI combine multiple tools in their workflows, using IP Adapters, LoRAs, and vision models together, so you don’t have to limit yourself to just one either.
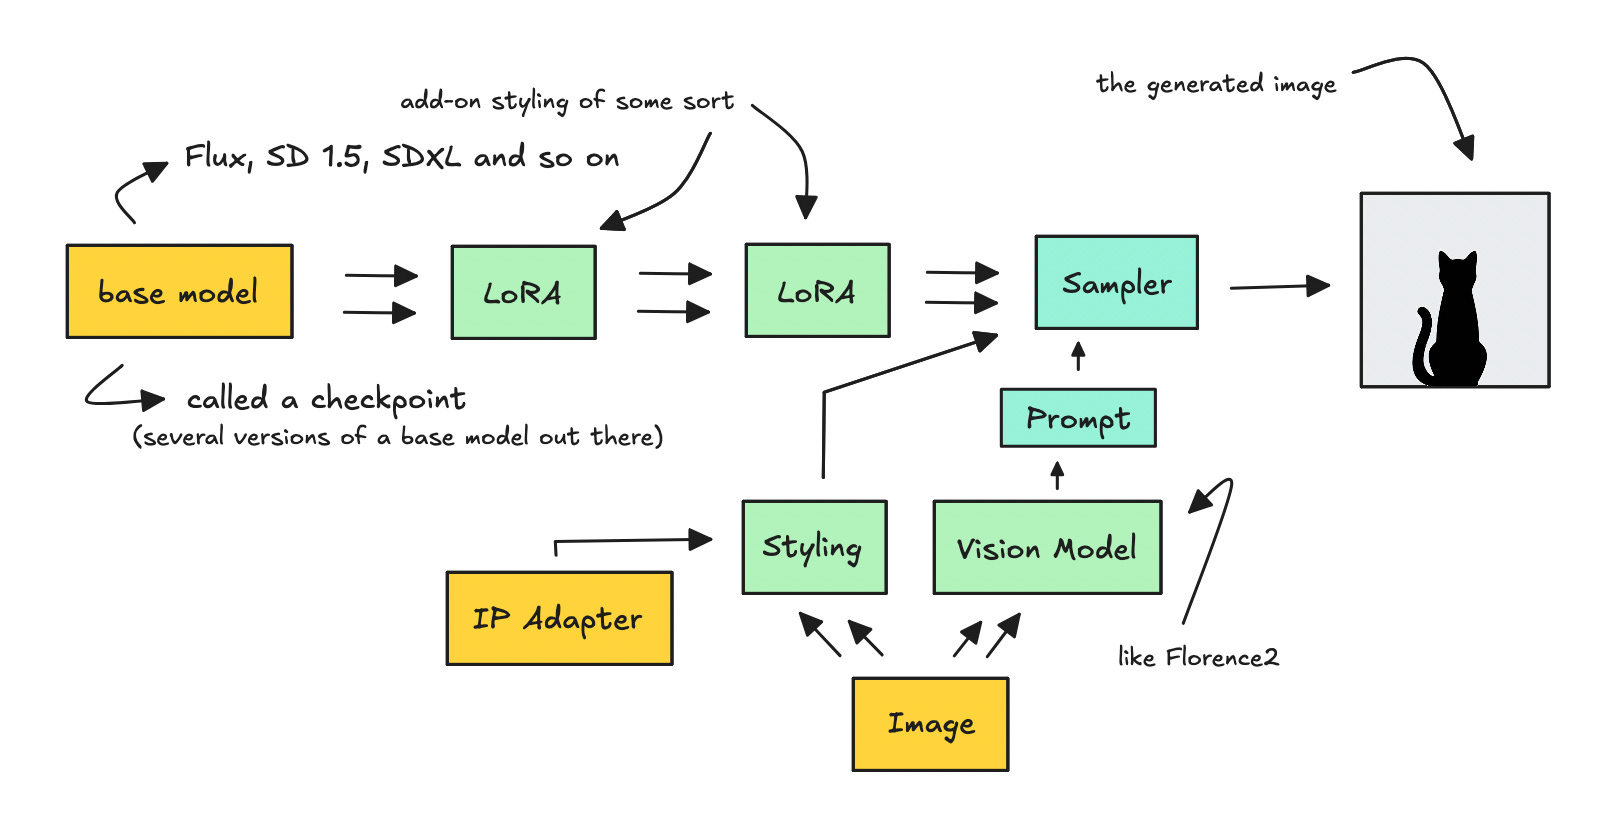
The workflow above is just one way to layer different techniques to generate an image.
That said, you don’t have to complicate things—using just one technology is completely fine too.
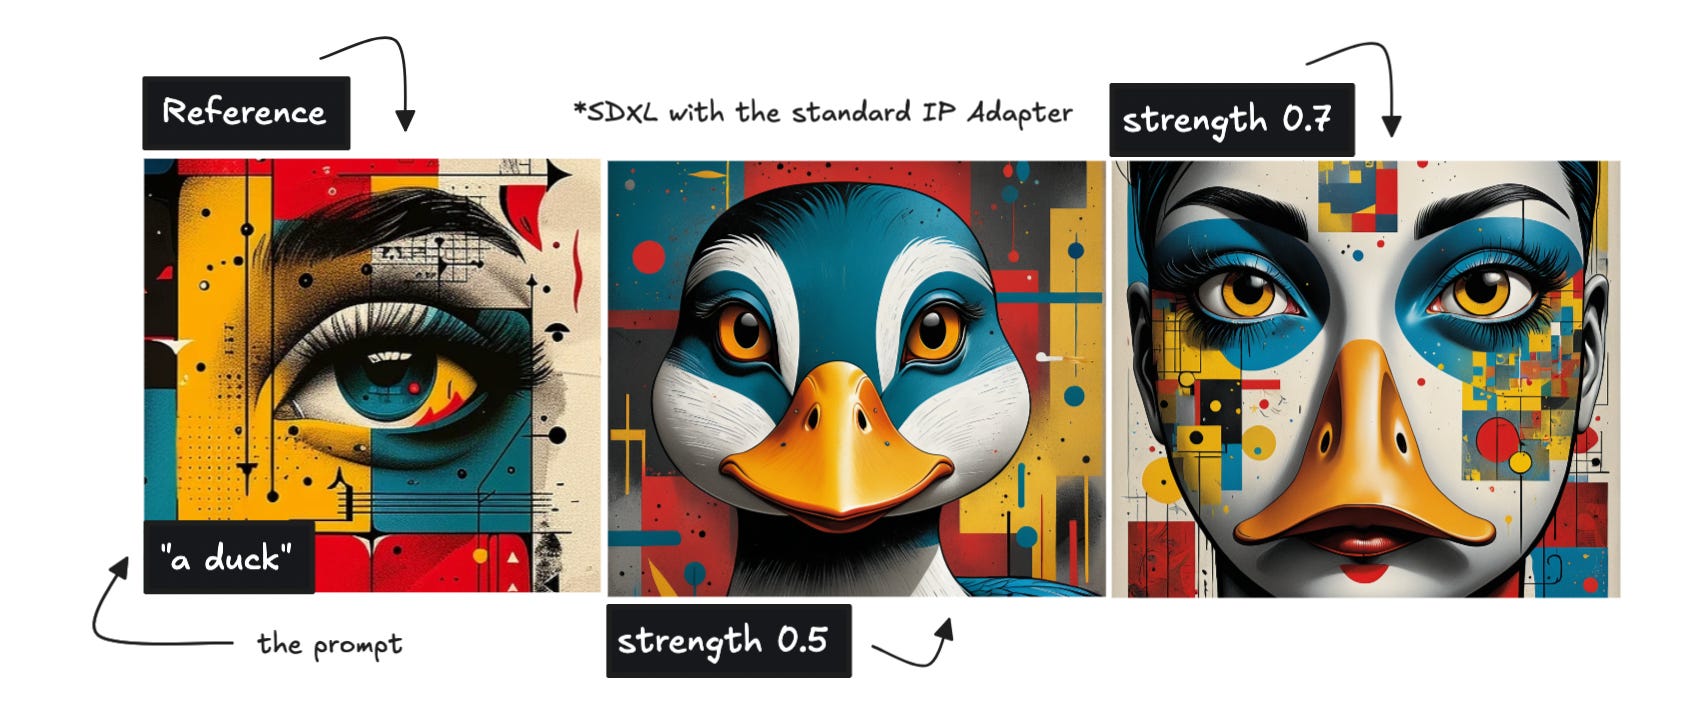
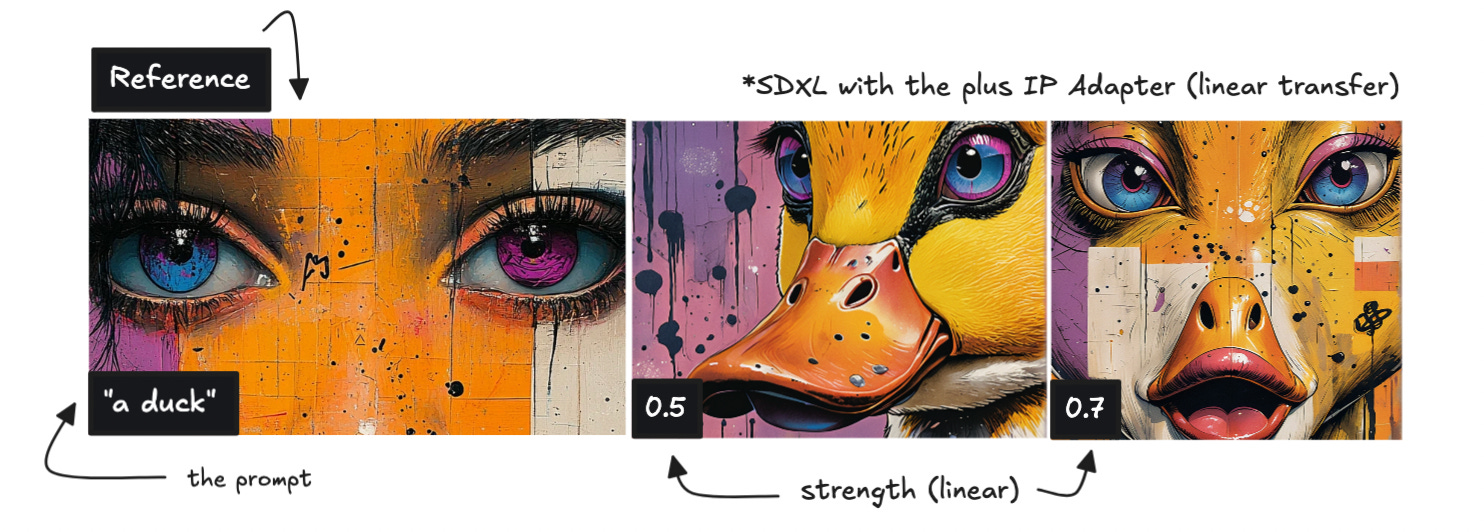
Standard vs Plus
In this post, I’ll experiment with three different base models, but only SD 1.5 and SDXL offer both standard and plus IP Adapter options.
Both versions use a vision model to convert your reference image into a set of basic numbers—features like colors, shapes, and textures. The vision model used is usually ViT-H, but some standard IP Adapters for SDXL uses ViT-BigG. This is imporant to know so you use the correct one.
These numbers are then passed through a linear projection. For the standard model, this process gently guides the generation, giving it a hint of the reference style.
This makes the standard IP Adapter a good choice when you want a subtle influence from the reference image while keeping the prompt as the dominant factor.

Without going too deep into technical details, the plus version extracts more detailed information from the reference image than the standard model, which means it has a stronger influence on the final generation.
I do believe it uses features from an earlier layer and then “resamples” them in a smarter way which should capture finer details.
You’ll see the difference in the picture above where the standard model isn’t transferring the same amount of detail but we still see similarities from the reference image.
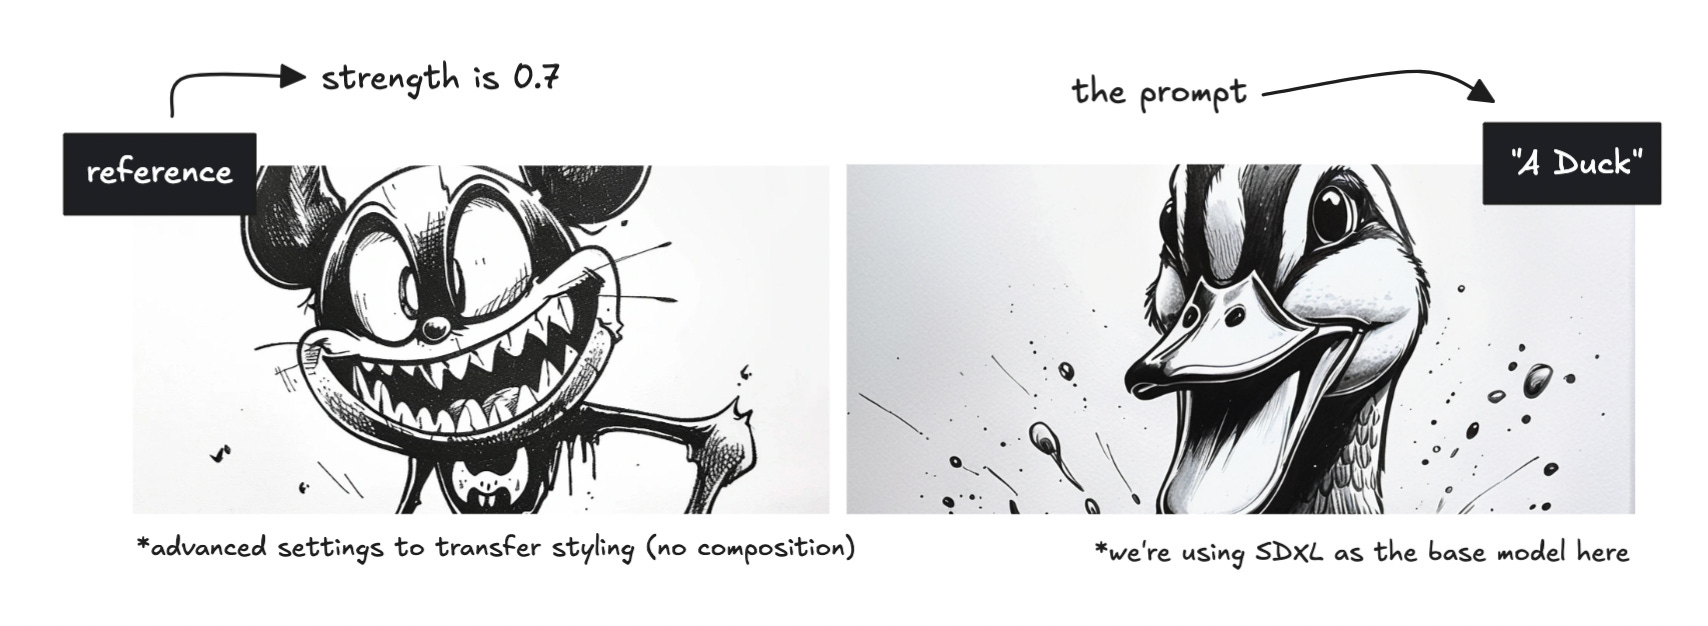
Composition vs Styling
When you don’t adjust the aspect being transferred, two main factors will influence your new image: composition and styling.
Composition refers to the overall structure of an image—the arrangement of objects, spatial layout, and poses or positions. This means that if you use an image of a duck as a reference and then prompt for a woman, you’ll likely get some strange results depending on the strength of the reference influence.
Styling, on the other hand, is about the artistic look and feel—things like colors, textures, and brush strokes.

Transferring style only means applying the aesthetic qualities of the reference image without forcing the structure to stay the same.
For example, if you use a duck image as a reference but prompt for a house, the AI won’t try to force the composition of a duck onto the house. Instead, it will take inspiration from the artistic feel of the reference, such as its colors and textures.
Not all models allow you to separate style from composition, but SD 1.5 and SDXL does using the advanced IP Adapter node. See the workflows here, set the settings to “strong style transfer” rather than “linear” if you want to focus purely on style. Otherwise, both composition and style will be transferred from your reference image.
That said, we can still try some tactics to adjust style transfer with the Flux model. See the same page for a Flux workflow.
The Practical Part
To really understand how an IP Adapter works, we need to test it across different models. I like to experiment with various images and see what happens.
A lot of newcomers tend to overlook older base models, but you really shouldn’t. SD 1.5 and SDXL both have commercial licenses and a massive community behind them. This means you can learn to create incredible work and even sell the results without worrying about legal repercussions.
You can check here to see which models are available for commercial use.
I primarily work in ComfyUI, but this should also be possible elsewhere. If you’re new to ComfyUI, remember check out my beginner’s tutorial here. To access the workflows we’ll be using in this post, see this list.
To keep things ethical, all base images used are AI-generated.
Full Transfer
As mentioned earlier, if we don’t specifically set the styling transfer, the model will use both composition and styling from the base image.
Now, let’s go through each base model: SD 1.5, SDXL, and Flux.
Stable Diffusion 1.5
Some say that SD 1.5 preserves details better with its IP Adapter than SDXL but may not match SDXL in overall image quality.
I’ll let you judge that for yourself.
We’ll start by testing the standard IP Adapter, which, as explained earlier, gives a subtle influence from the reference image while keeping the prompt as the dominant factor.

You can see the original fox image as the reference, followed by two generated images with different strength settings using the prompt “Fox, illustration.”
The blue background remains somewhat intact, and with a higher strength setting, more details are applied to the image. However, it’s not quite similar to the reference image.
If you want to test this yourself, you can grab this workflow. Just make sure to use an SD 1.5 checkpoint, load the correct IP Adapter model for SD 1.5, and set up the ViT-H vision model. It should already be set, but be sure you have the models in the correct directories.
Now, let's try the same image with the plus model and see the results below.

We can see that the plus model transfers more details, even at 0.5 strength, and at 0.7, the results improve even further. To work with the plus model, simply change the IP Adapter model to the plus one. Remember you’ll need to have it downloaded.
With a full transfer like this, both styling and composition are applied. This means that if your reference image doesn’t closely match your prompt, you may end up with disfigured results. For example, using a fox image as a reference while prompting for a woman is unlikely to work well.
All workflows can be found here.
Stable Diffusion XL
SDXL is noted for its higher general image quality within the community but people say that it may not transfer details as effectively.
I find SDXL is less prone to disfigured images even if we start with something else which means we can try to prompt for a duck with an image of a woman.
To work with SDXL you simply pick a checkpoint, such as Juggernaut and then pick an IP Adapter.
The IP Adapter I am testing below is the standard one.
You’ll find all workflows here. For the SDXL one, it is using the Plus IP Adapter, but you can easily switch it out to the standard IP Adapter.
If we try with the plus model we’ll get slightly stronger results though.
Flux Dev
I know a lot of people prefer Flux Dev for image generation, but it’s still relatively new within the community. If you're working with Flux Dev, keep in mind that you can’t build and sell systems on top of it due to licensing restrictions. However, you can sell the generated outputs.
Since Flux is still in its early stages, there aren’t as many IP Adapters available for it. There are a few unofficial ones, such as the XLabs IP Adapter, and an official Redux model released a few months ago by Black Forest Labs.
We’ll test both of them on the same image we used for SD 1.5 below.

Redux performs better than XLabs unofficial IP Adapter, which retains very little styling from the reference image. You’ll find the workflow for Redux here.
However, Flux doesn’t offer the same level of control over styling vs composition as SD 1.5 and SDXL, making it harder to get ideal results.
Style Transfer
As we discussed, sometimes we only want to transfer styling without affecting composition. With SD 1.5 and SDXL, this is easier since we can simply adjust the settings in the advanced IP Adapter node.
With Flux, we don’t have the same level of control, so we need to lower the strength and experiment until we get a result that works.
We can start with looking at the results for Stable Diffusion 1.5 though, using the prompt “A fox, illustration” with the strength set to 0.7.
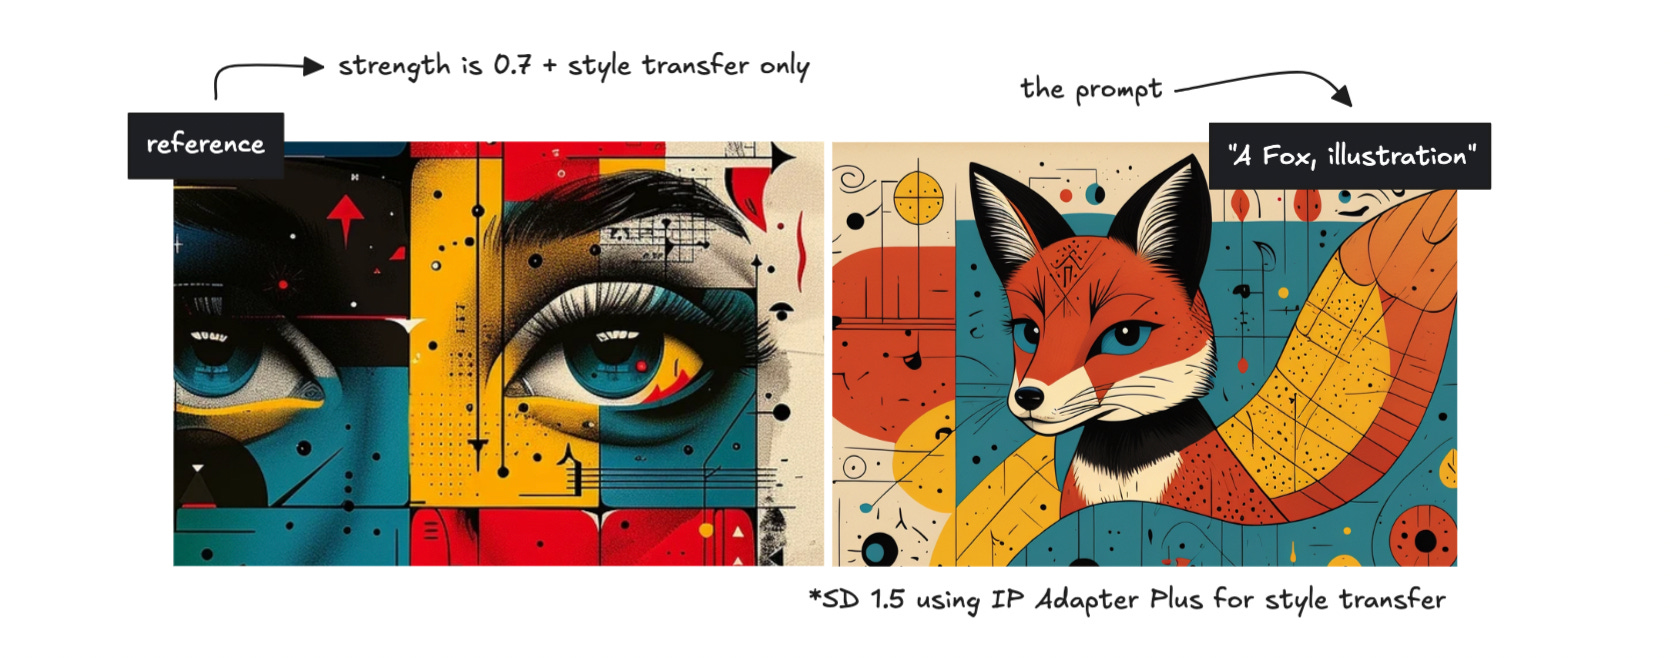
We are using the plus IP Adapter here and the results are fine, but perhaps not completely similar to the base image.
We’ll then try the same with SDXL, but using the prompt “A duck, illustration” while applying the styling from this other reference image.

You should play around on your own here with various images so you get a feel of what you prefer.
In both cases, we’re using the plus IP Adapter, setting the strength to 0.7, and choosing “strong style transfer” for the weight type. Remember that you’ll find the workflows here.
Flux (Style Transfer)
Flux makes it harder to transfer only styling in the same way SD does. However, using the Style Model Advanced node in this workflow, we can apply a very weak strength to get a similar effect with Flux Redux.
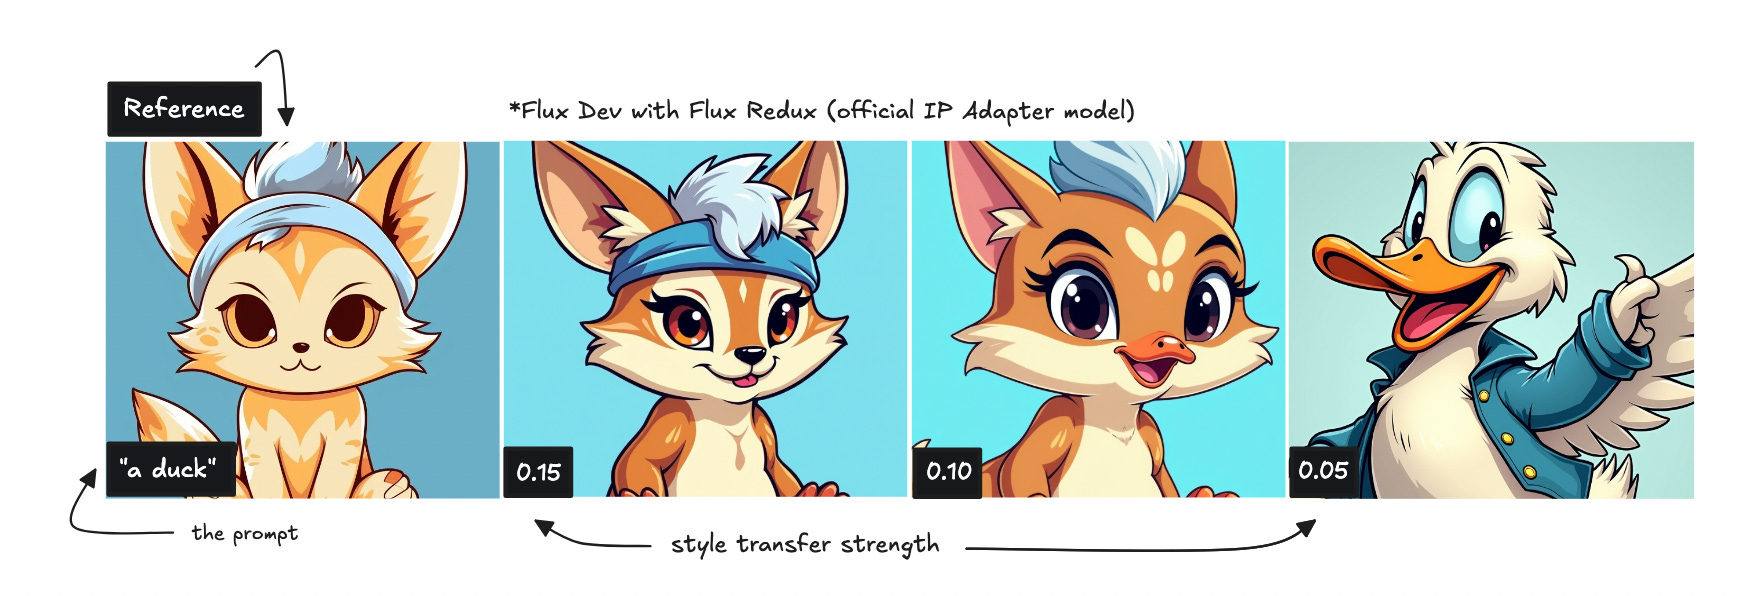
As seen above, Flux produces higher-quality images, but it doesn’t let us separate styling from composition as easily. If the strength is too high, both style and composition are transferred. If it’s too low, the result drifts too far from the reference.
We’ll try another reference image as well.

The results are slightly better, though maybe not exactly what we were aiming for. The output does look very artistic, though.
You can use the same workflow I shared before, and set the strength to very low to achieve the same thing.
Combining Different Images
To combine different images in an IP Adapter, we can use the Batch Images node and then continue as usual.
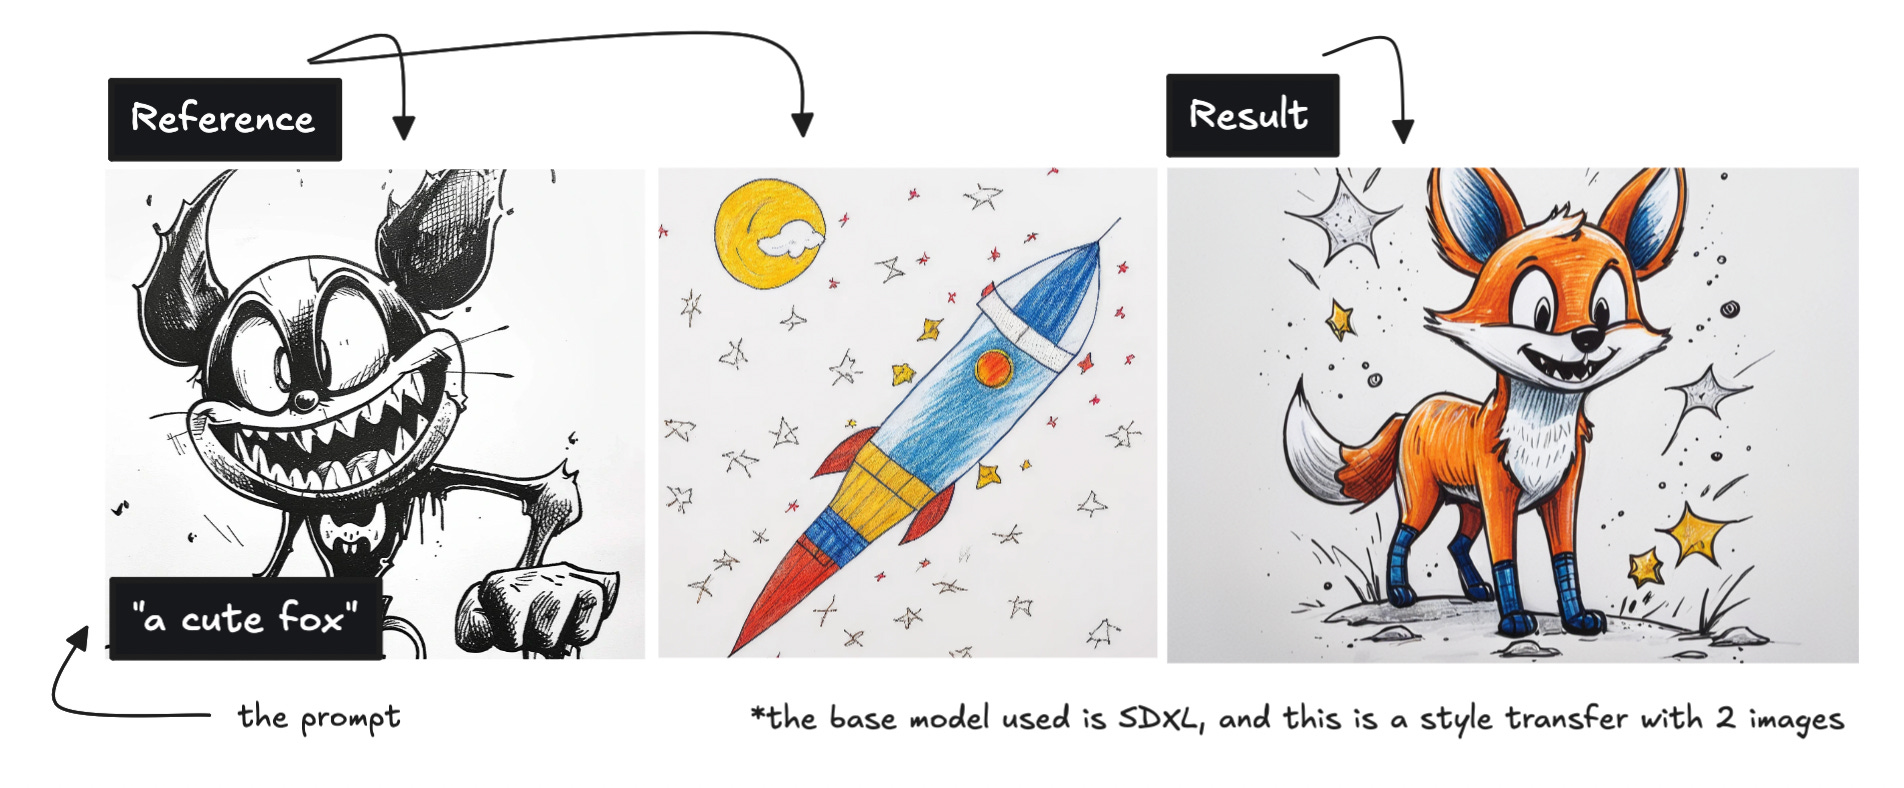
Below, you’ll see an example where I’ve used two different images along with the prompt “a cute fox” to generate an image.
We can try this with another image to see how the final output changes.

If you’re aiming for more cartoon-like characters, some of the images below might be useful.

You can probably already think of other ways to transfer styling, using references from Disney, Pixar, or various art styles.
You can boot up this workflow to combine images using the SDXL IP Adapter Plus.
Hopefully, this gave you some new insights and inspiration to experiment with ComfyUI or any other image generation tool.
I’ll try to do a piece on IP Adapters for facial transfer in the future as well.
❤️